
Common Flashing Example
The following is meant to give you an understanding of smartphone flashing and make you familiar with the process. It is not a 1:1 tutorial for your specific device! However, since modifying your device for the first time can be really scary, I hope this may help you finding through the process. I’ll try to give you any information you need to find the proper resources to find anything you need.
Again a word of warning: Flashing your device will void your warranty and can lead to a bricked, unusably device. I’m not responsible for any lost data or broken device!

Backup your old Phone
First of all we want to backup all of our data in a way we can import them again later. If you use your own cloud already you don’t need to backup everything, however there ARE apps that need manual intervention, such as Signal or Threema. I repeatedly forgot to backup these, forcing me to create a new ID as I couldn’t access my old one.
The following are either free apps or a reminder for you for each step:


Contact Backup
You can backup your contacts directly through your contact book. The appropriate features for that are hidden inside the settings.
Neo Backup
A powerful backup tool for your app data. This way you’re able to seriously backup everything. A very nice way to use this is to set it up for regular background backups, then create a nextcloud folder sync to automatically upload new backups to truly be able to recover from desasters.
Available on F-Droid. You can download it as .apk here.
How to use:
After installing the app and giving it the correct permissions, select the second bottom tab. There you got two checkboxes for every app – the first one lets you back up the .apk file itself. The second are actual app data you generated – this is what we’re primarily here for.
After selecting all apps you want to save just click the “Backup”. This will take quite some time (especially if you backup huge amounts of data like games).
I strongly recommend not trying to backup apps like Threema or Signal, but to use their built-in backup feature. They might try to prevent data collection – at least Signal seemingly did when I tried.


Chat Apps
Secure chat apps – such as Threema and Signal – need to be backed up manually. Do not forget them, otherwise you’ll lose your chatlogs as well as security pairings and your mates might receive security alerts since your device session changed.

Internal Storage
Last but not least, don’t forget to get any data you want to keep (for example photos) off your internal storage.
Choose your ROM & look up threads
Now you want to choose your ROM (Page 6) and look up the corresponding instructions. Many good operating systems do have great guides or direct links on their websites – especially /e/ and LineageOS offer any information you might need exactly where you need it. For everything else your main source of information is the XDA forum.
On XDA there are three things you need to look up: The corresponding Unlock-, TWRP– and corresponding ROM threads for your device and chosen ROM. Those are marked with [GUIDE], [RECOVERY] and [ROM] respectively.


This step differs from vendor to vendor. Some, namely Huawei, even decided to lock down it altogether, killing the market for aftermarket ROMs altogether. Others, like Xiaomi, want you to wait a few days before they give you the unlock key. Make sure you got all prerequisites mentioned in your unlock thread before proceeding.
Below I’ll show you the standard way Android provides.


Beside OEM unlocking we’ll also want USB Debugging to be enabled, as we now need to send commands through adb to the device.
Now, reboot your device by sending the command ‘adb reboot bootloader‘ (without ”) on your PC. Your smartphone should instantly reboot into the bootloader, probably telling you it’s in “fastboot mode”. In there, send either ‘fastboot flashing unlock‘ or ‘fastboot OEM unlock‘, depending on your device. This is also the place where you may need the unlock key I already mentioned.

Now that we freed our phone we can proceed flashing a custom recovery. First, we want to reboot into the bootloader again. Either use adb, or by using a unique button combination while your phone is turned off. The correct combination is again specific for each device, a quick internet search will help you here. For example, on the OnePlus 7 Pro you have to press Vol+, Vol- and Power simultaneously until you see the fastboot screen coming up.
- On many phones you’re supposed to flash the TWRP directly. In that case, while in fastboot, use the single file provided with ‘fastboot flash twrp-filename.img‘. Afterwards you may be able to enter recovery by sending ‘fastboot reboot recovery‘. Unfortunately this ain’t standard procedure, so you might have to turn the phone off and boot into recovery using a button combination.
- If you downloaded two TWRP files, you boot into TWRP by sending ‘fastboot boot twrp-filename.img‘. You can do so more easily by typing the first two to three letters, then hitting tab for autocompletion of file name. Make sure NOT to boot the twrp installer file if it exists – we will use that one in a minute. In case your phone doesn’t boot into TWRP after 1 or 2 minutes, shut it down by holding the power button and try again. This usually shouldn’t happen, however I had the experience that some phones are a little bit bitchy.
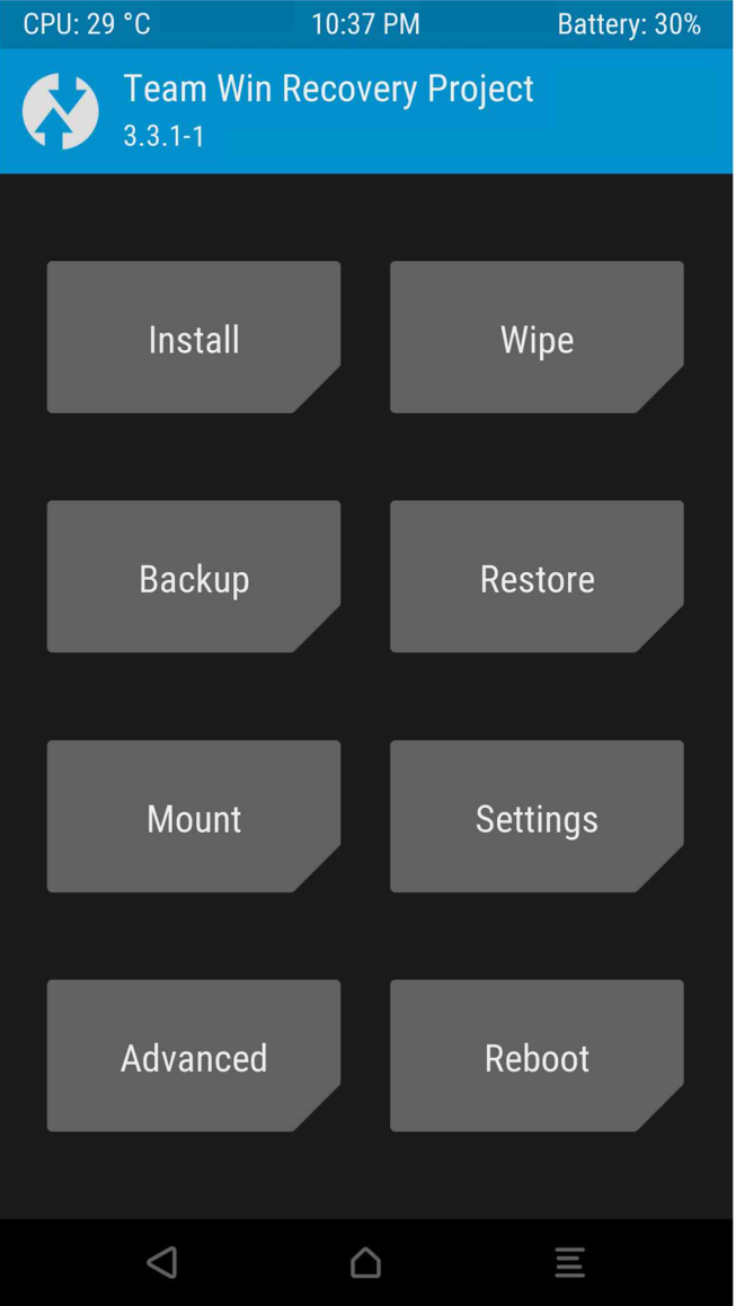
Now that we are in TWRP, we need to permanently install it. Right now we only booted it temporarily, after rebooting it would vanish again. Go into Advanced –> adb sideload and swipe to activate it. Now, on your computer, send the command ‘adb sideload twrp-installer-filename.img‘. Reboot to Recovery, done. 🙂

For the next step you need to get your prefered operating system. As many websites do not sort by the official devices name but their model name, you need to look yours up. For example, the OnePlus 7 Pro is also called “guacamole”, a Galaxy S9 is SM-G960*.
After placing the image into your working folder, we first need to wipe your device clean. Go into Wipe, select Dalvik, Cache, system, data and internal storage, then swipe to wipe. After that go to advanced and start adb sideload. Use ‘adb sideload <imagename>‘ to send the image file to your phone. This may take a while – don’t take the percentage shown by adb too seriously, it sometimes stops at weird values.
On devices with two system slots you have to do this twice so both system slots do have the same files to start with. To change, click in reboot and select the other slot on the bottom. Then reboot recovery and flash the rom another time.
Finally, select Wipe and delete the Dalvik Cache another time.
Optional:
- To root your device, download Magisk from here. Rename the .apk file to .zip file and use adb sideload to flash it.
In case the process doesn’t work for some reason take a look at these instructions. - If you really want to have Google Apps, now is the time to install it BEFORE booting your new operating system the first time. Download your flavour of OpenGApps and sideload it. You can find more about this in the glossary on Page 3.
After installing anything optional at this stage remember to wipe Dalvik & Cache again.

Now there’s not much to say about this step, is it? In case your operating system of choice doesn’t come with any App Store or not with the one you like, take a look at F-Droid as well as Aurora Store on Page 3. Do not forget to disable USB Debugging after you’re finished, since having this enabled by default is a security risk.
Next Page: Manually installing MicroG